Power Level Valve Rebuild
When I bought my GMC, a 1975 Palm Beach, the Power Level system was not working. The PO had installed cutoff ball valves at each rear wheel set, and leveling was achieved with an air compressor through Schrader valves located at each airbag. It was adequate for a temporary solution, but hardly ideal.
So I decided to take things on, starting at known failure points, focusing on the compressor -- the Dana was shot -- and replacing it with a Viair 480c (that's a different story and a different post), and the Power Level valves. I used Applied GMC's rebuild kit for those valves first, and had partial success. The new O-rings did their job of sealing, as did the valve gaskets, but the Viair is a beast, and after a few days the cork-composite valve body gaskets blew out. IMO that material is just not tough enough, resilient enough, for 120 PSI.
I looked at JR Slaten's Power Level II valves, based on high-quality Swagelok parts, but before spending $500 I thought I'd take another shot at those Power Level valves, as I could easily make my own valve gaskets out of some 1/8" sheet EPDM rubber I had left over from a roofing project.
After weeks now of holding air with nary a peep out of the compressor, I can report that the EPDM gaskets have successfully fixed the original valves. The system has now held with no discernible leakdown for long enough that I can say that it does not leak.
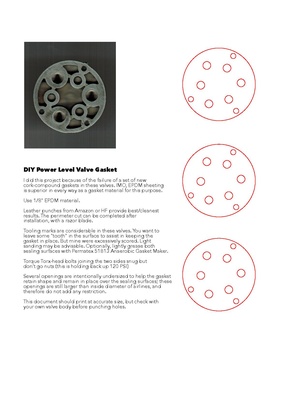
To create the valve gaskets, download the DIY Power Level Gasket PDF to use as a guide.
Leather punches from Harbor Freight provided clean results in the process of creating the holes in the gasket. The perimeter cut can be completed after installation, with a razor blade.
Tooling marks are considerable in these valves. You want to leave some "tooth" in the surface to assist in keeping the gasket in place. But mine were excessively scored. Light sanding may be advisable. Optionally, lightly grease both sealing surfaces with Permatex 51813 Anaerobic Gasket Maker.
Torque Torx-head bolts joining the two sides of the valve snug but don't go nuts (remember, you're holding 120 PSI, so "snug" means that the rubber is compressed adequately to seal against those imperfect surfaces).
Note: Several openings in the downloadable gasket template are intentionally undersized to help the gasket retain shape and remain in place over the sealing surfaces; these openings are still larger than inside diameter of airlines, and therefore do not add any restriction.
Additionally ...
I replaced the lines between the Power Level valves and the butt connectors in the engine compartment, cutting an additional two inches or so -- carefully, with a tool specially made for cutting airlines -- from the old lines to create a new sealing surface for the O-rings in the Prestoloks. New Parker Prestolok butt connectors (32PLP-4) along with a Y-connector (362PLP-4) for the main air supply located immediately behind the valves were purchased, along with new color-coded 1120-series airline tubing from the valves to the butt connectors. PartsGopher.com was the best vendor I was able to find for this tubing in short lengths. I went with 4 feet per line, but 3 would be fine. I also changed the tubing connectors on the valve bodies themselves to Parker Prestolok, purchased at my local Parker Store; I'll edit this to include the model number.